
Table of Contents
- Professional Grooming Shears vs Standard Scissors: The Core Difference
- Types of Dog Grooming Shears and What Each One Does
- Blade Length, Coat Type, and Dog Size: Matching the Tool to the Job
- Best Dog Grooming Shears for Beginners: What to Look For First
- Safe Dog Hair Trimming Tips for Home Groomers
- How to Maintain Dog Grooming Shears So They Stay Sharp
- Frequently Asked Questions
Last Updated: October 17, 2026
Professional Grooming Shears vs Standard Scissors: The Core Difference
Professional grooming shears are purpose-built cutting tools with convex ground blades, tension controls, and ergonomic handles designed to slice through dense dog fur.
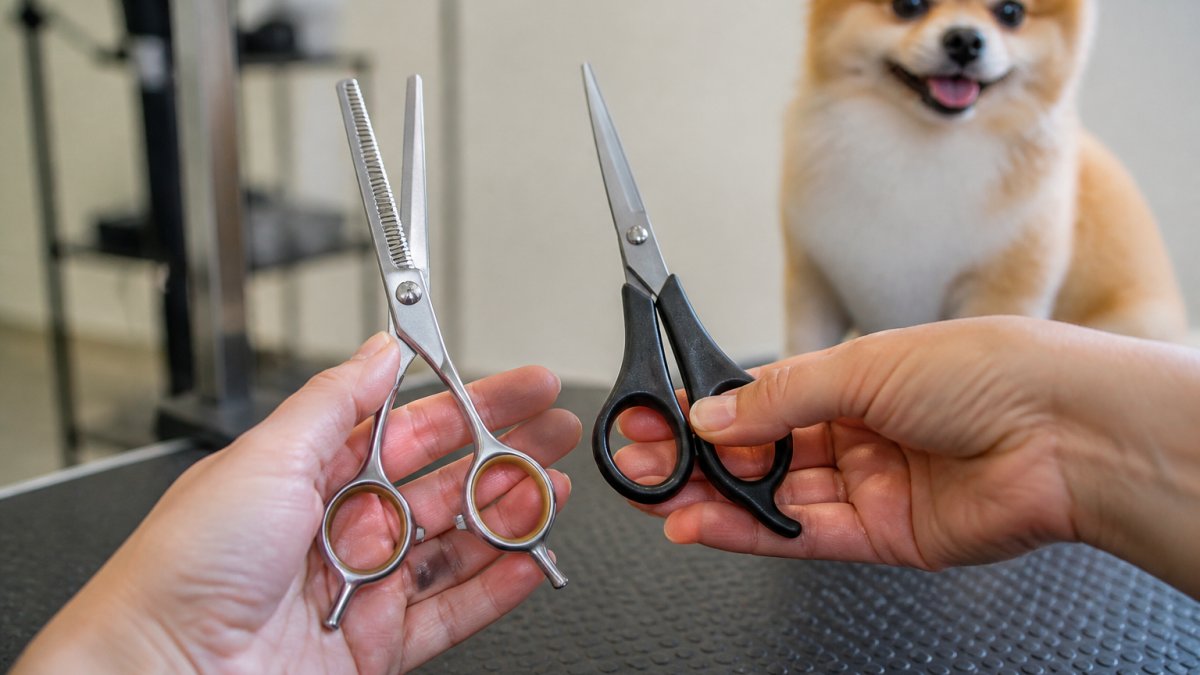
At PetzGlow, we hear weekly from home groomers who started with kitchen scissors and ended up with a patchy coat and a nervous dog.
Below: why the tools behave differently, which shear types handle which jobs, and how to pick a first pair without overspending.
Why Household Scissors Fail on Dog Fur
Household scissors are built for paper, thread, and tape, not dog fur.
A dog's coat packs thousands of hairs per square centimeter, often with a soft undercoat beneath a coarser topcoat.
A common mistake is assuming sharpness solves this. A razor-sharp kitchen shear still has the wrong geometry for fur: sharpness affects penetration, geometry affects whether hair is sliced or crushed.
What Professional Grooming Scissors Do Differently
Professional grooming scissors solve the geometry problem. Most quality shears use a convex edge, ground thin and slightly rounded on the outside, which slices cleanly through coat instead of crushing it.
Three other design choices matter:
- Tension control. An adjustable screw sets how tightly the blades meet; too loose and the shear folds hair, too tight and it drags. Household scissors rarely offer this.
- Offset handles. The thumb handle sits shorter than the finger handle, keeping your wrist relaxed during long sessions. Standard scissors usually have symmetric handles.
- Round safety tips. Many beginner-friendly shears ship with rounded points to reduce poke risk on sensitive areas. Household scissors almost never do.
The PetzGlow Professional 4-in-1 Dog & Cat Grooming Scissors Kit puts this design into practice: a straight shear, curved shear, thinning shear, and comb in 6.5-inch lengths, built from 4CR titanium-plated stainless steel with round tips and a silencer between the handles.

Side-by-Side: Blade Geometry, Control, and Safety
| Feature | Standard Household Scissors | Professional Grooming Shears |
|---|---|---|
| Edge geometry | Beveled, 25-35° per side | Convex ground, often 20-25° |
| Cutting action | Pushes and crushes fiber | Slices cleanly through coat |
| Tension adjustment | Rare; riveted pivot | Adjustable screw standard |
| Handle design | Symmetric, fixed | Offset, often with removable finger rings |
| Tip shape | Sharp, pointed | Round safety tips common |
| Blade length | 7-8 in typical | 5.5-8 in, sized to dog and task |
| Intended material | Paper, thread, tape | Dense animal coat |
| Maintenance | Occasional sharpening | Regular oiling, tension checks, professional sharpening |
Two rows deserve emphasis. Cutting action explains the patchy finish most owners notice after a first home trim: a beveled edge on dense fur produces folded tips that look uneven as the coat settles. Tip shape explains the nicks: pointed household tips are the wrong tool near ears, paws, or skin folds.
When Standard Scissors Are Acceptable, and When They Aren't
Household scissors can do limited work without harm in a few narrow situations: trimming a single stray hair from the face, cutting a small tangle out of an otherwise clean coat, or snipping fur from a paw pad, with small blunt-tipped scissors, if the dog is calm and the area is visible.
Standard scissors are the wrong choice when:
- The coat is dense, matted, or double-coated, where a beveled edge will fold rather than cut.
- You're working near ears, eyes, paws, or skin folds, where a pointed tip is a puncture risk.
- The dog is anxious or moving, where a tool without a finger rest is harder to control.
For anything beyond a stray hair, the practical answer is a grooming shear sized to the dog and the task.
Types of Dog Grooming Shears and What Each One Does
Three shear types cover nearly every home grooming task: straight, curved, and thinning.
Straight shears cut in a flat line for body work, leg tidying, and general length reduction on straight coats.
Curved shears have a bowed blade for contouring around a head, paw, or hindquarter without creating flat spots.
| Shear Type | Primary Job | Best For | Watch Out For |
|---|---|---|---|
| Straight | Flat-line cutting | Body, legs, general trimming | Flat spots on rounded areas |
| Curved | Contouring and shaping | Face, paws, hindquarters | Over-cutting on first pass |
| Thinning | Removing volume, blending | Dense coats, transition zones | Using as a length cutter |
A fourth category, blending shears, sits between thinning and straight.
Blade Length, Coat Type, and Dog Size: Matching the Tool to the Job
Blade length should match both the dog's size and the coat's density. A 6-inch shear is the practical default for most home groomers. Seven-inch shears suit larger dogs and bulk removal. Eight-inch shears belong in professional hands working big, thick-coated breeds.
Here's how we'd match tools to common situations:
- Small breeds and puppies: 5.5 to 6-inch shears. Shorter blades give more control near faces and paws.
- Medium dogs with curly coats: 6.5-inch curved and thinning shears. Curly coat hides uneven cuts until it's too late, so contouring tools earn their keep.
- Large dogs with dense double coats: 7-inch straight shears for bulk work, plus thinning shears for blending.
Coat type changes the plan as much as size does. A short, smooth coat forgives imprecise lines. A curly or dense coat amplifies every mistake.
Serrated and Micro-Serrated Edges Explained
A serrated edge has small teeth along the blade. Micro-serrations are finer still, nearly invisible to the eye.
These edges grip slippery hair that would otherwise slide along the blade, useful on fine, silky coats and on dogs that move during trimming. The trade-off: they leave a slightly textured finish and are harder to sharpen at home. For most beginners, a smooth convex edge on the main shear plus one micro-serrated option covers the bases.
Professional 4 In 1 Dog Cat Grooming Scissors Kit With Safety Round Tips,Sharp →
Best Dog Grooming Shears for Beginners: What to Look For First
The best dog grooming shears for beginners balance safety, control, and price. You don't need a professional set to trim a family pet, but you do need the right basics, and the measurable trade-offs behind each spec.
The Decision Table: What Each Spec Actually Changes
Every spec on a shear listing maps to a real trade-off. The table below translates marketing language into what you'll feel in your hand and see on the coat.
| Spec | Typical Range | What It Changes | Trade-Off |
|---|---|---|---|
| Blade length | 5.5-8 in | Reach vs. control | Longer reaches more coat per cut but is harder to control near faces and paws |
| Weight | 1.5-3 oz per shear | Fatigue vs. stability | Lighter reduces hand fatigue; heavier feels steadier on thick coat |
| Edge type | Bevel, convex, serrated | Cut quality vs. durability | Convex slices cleanest; serrated grips slippery hair but textures the finish |
| Tension | Fixed vs. adjustable | Blade feel vs. maintenance | Adjustable lets you tune drag; fixed is simpler but less forgiving |
| Handle | Symmetric vs. offset | Wrist position vs. familiarity | Offset reduces strain on long sessions; symmetric feels like household scissors |
| Tip | Sharp vs. round | Precision vs. safety | Round tips reduce poke risk; sharp tips allow finer point work |
| Steel | 4CR, 440C, VG-10 class | Edge retention vs. price | Harder steel holds an edge longer but costs more and needs professional sharpening |
Use the table as a filter, not a scorecard. A beginner trimming a small dog monthly doesn't need VG-10 steel or an 8-inch blade. A home groomer with a thick-coated breed and a monthly full trim will feel the difference in edge retention and reach within a few sessions.
Matching Length and Weight to Your Dog and Your Hand
Weight matters as much as length, and it's the spec most beginners ignore. A 2.5-ounce shear feels stable on a dense coat but tires the hand after 20 minutes of detail work; a 1.8-ounce shear is easier on the hand but can feel skittish on thick fur.
Hand size and handedness are the other two variables the checklist misses. Most grooming shears are built for right-handed users, with the thumb blade on top; left-handed groomers need left-handed shears or must learn to cut with the opposite hand, which affects control and safety.
Ergonomics and Repetitive Strain
Grooming is repetitive, and hand fatigue is the most common complaint from home groomers after their first few full trims. Offset handles are the single biggest ergonomic upgrade over household scissors: the shorter thumb handle keeps the wrist neutral, reducing strain during long sessions.
If you already experience hand or wrist pain, try these adjustments before buying a more expensive shear:
- Take breaks every 10 to 15 minutes and stretch your fingers and wrist.
- Alternate between straight, curved, and thinning work so no single grip is held for long.
- Keep the shear sharp; a dull blade forces you to squeeze harder, a common cause of strain.
For significant hand or wrist issues, a professional groomer or a clipper-based approach may be safer for full trims. Shears are the right tool for shaping and finishing, but knowing when to switch is part of good ergonomics.
The Beginner Buying Checklist
Here's the checklist to run against any candidate shear:
- Round tips on every shear you'll use near the face, ears, and paws
- 6 to 6.5-inch blade length for control on small and medium dogs
- Adjustable tension screw so you can tune blade resistance
A kit usually beats buying singles. The PetzGlow 4-in-1 set covers straight, curved, and thinning work in one purchase at $89.99, a sensible starting point for a home groomer who wants professional-grade tools without assembling a collection piece by piece.
Safe Dog Hair Trimming Tips for Home Groomers
Safety comes down to three habits: stable footing, calm handling, and conservative cuts. Start with the dog secured on a non-slip surface at a comfortable working height; grooming tables raise the dog to your hands instead of forcing you to crouch, improving control and comfort.
Then follow these rules:
- Cut with the coat, not against it, unless you're deliberately creating texture.
- Work in small sections and comb through after each pass to check length.
- Keep blade tips pointed away from skin and use the flat of the blade, never the point.
If your dog is anxious, quiet tools help. That's part of why PetzGlow builds its grooming equipment around reducing the struggle: a calmer dog is a safer dog to trim.
How to Maintain Dog Grooming Shears So They Stay Sharp
Maintenance is where most home groomers lose their investment. A quality shear cleaned and oiled after each use holds its edge far longer than one left dirty in a drawer.
The routine:
- Wipe blades after every session with a dry cloth to remove hair and moisture.
- Oil the pivot point with a drop of shear oil, then open and close the blades a few times to spread it.
- Check tension monthly. Hold the shear tip-up and let the blades close under their own weight. If they don't close, loosen the screw slightly.
- Store closed and dry in a case, away from moisture and dropped edges.
- Get them professionally sharpened when cutting starts to pull rather than slice. Home sharpening kits usually do more harm than good.
Total cost of ownership favors quality steel. A well-maintained professional shear can be sharpened repeatedly over years, while cheap shears often get replaced outright.
Trimming your dog at home is a skill, and the right tools shorten the learning curve dramatically.
PetzGlow stocks professional-grade grooming equipment designed to make daily care easier and calmer, from the 4-in-1 Grooming Scissors Kit with safety round tips and offset grips to grooming tables and bath tubs that keep your dog steady and your setup mess-free.
Frequently Asked Questions
Can you use standard scissors to cut a dog's hair?
You can physically cut fur with household scissors, but the results are usually uneven and risky. Standard scissors have long, straight blades with sharp points, so they are easy to poke skin and hard to control around the face, paws, and ears. They also crush and split the coat instead of slicing it cleanly, which leaves a ragged finish. Professional grooming shears have rounded safety tips, shorter blades, and a tension screw that keeps the cut smooth. For anything beyond a tiny snip, grooming shears are the better choice.
What is the difference between grooming shears and regular scissors?
The main differences are blade design, size, and control. Grooming shears typically run 6 to 8 inches with a curved or straight edge, a rounded tip, and an offset handle that keeps your hand relaxed. Regular scissors are built for paper, fabric, or packaging, with pointed tips and a pivot that is not tuned for thick fur. Grooming shears also come in thinning and blending versions that remove volume without leaving visible lines, which standard scissors cannot do.
Are professional grooming shears safer for dogs?
They are safer when used correctly, mainly because of the rounded tips and the shorter blade length that gives you more control near sensitive areas. A tension screw lets you adjust the gap so the blades slice rather than pull, which reduces snagging and sudden jerks that startle a dog. That said, no shear is foolproof. Keep the blade parallel to the skin, work in small sections, and never cut toward a fold of skin. Pair sharp tools with a calm, steady hand.
How should you clean and maintain dog grooming shears?
Wipe the blades with a soft cloth after every session to remove loose hair and oils, then apply a drop of shear oil at the pivot and open and close the blades a few times. Store them in a case or pouch so the edges do not knock against other tools. Check the tension screw monthly and tighten it if the blades feel loose or start folding hair instead of cutting. Professional sharpening every 6 to 12 months keeps the edge true, and never cut paper or plastic with them.